
As you know, OVF (Open Virtualization Format) helps to deploy applications by means of already configured virtual machine templates. Obviously, there are always at least two ways to solve a problem. So, if you want to deploy a virtual machine manually – be ready to spend some time for the task to be accomplished. To save your time and make the process a much easier one, try OVF and deploy the pre-configured application in just a few clicks! Recently I have received information that StarWind Virtual SAN starts supporting OVF.
UPDATE: You should check the latest StarWind Virtual SAN Free vs Paid New Offer for 2017 which lifted almost all limits. (No Node limit, no capacity limit)
In today's post we'll try to explore another way to deploy StarWind Virtual SAN in VMware vSphere environment and this method is via OVF. The OVF encapsulates a VHDX with Microsoft Windows Server Standard edition (trial of 180 days) with pre-installed StarWind Virtual SAN software. It makes the deployment process easier even if there is small gotcha (does that mean little understanding? Sounds extremely weird). Due to Microsoft licensing policy it's not possible for StarWind to distribute Windows Server directly via OVF so you'll need to convert the VHDX into VMDK first. The conversion process is straightforward via StarWind V2V converter, but we'll go through the steps in this post in details.
Starwind Virtual SAN can be installed few different ways. We have already tested few of them:
- Full – We have already tested the full installation in our review here, on the top of Windows Server 2012R2
- Without Windows license – A “low-cost” version, which is how a completely free (limited in features) version gets installed on the top of Free Microsoft Hyper-V: Install Free StarWind SAN on Free Hyper-V. This solution will need a management workstation to install the Starwind console for the whole management as the Hyper-V server does not provide a Windows UI.
- Via OVF – Prepackaged solution for VMware vSphere environments. Easy to deploy test, and activate.
What do you need to get started?
- Download the prepackaged StarWind Virtual SAN
- StarWind V2V Converter (in the package)
- The OVF file (part of the package as well)
- Two ESXi hosts managed by vCenter server
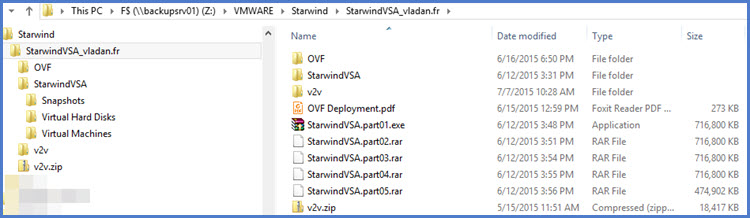
Let's take a look what's in the package when you first download the Starwind's product. As you can see you have the VHDX which needs to be extracted first from executing the StarwindVSA.part1.exe , that there is also the v2v.zip file which contains the StarWind V2V converter product which we'll be using to convert the VHDX into VMDK.
So let's convert the VHDX into VMDK… Nothing difficult. Start Converter > pick the VHDX virtual disk > follow assistant > select VMware Growable image as destination image > for destination choose the same folder as the OVF file > next… The conversion process takes about 9 min only but if you're storing the VHDX locally on a SSD drive then you probably get faster results as in my case I did the conversion on remote NAS device directly.

Done….
You should end up with this…

Configuration of both ESXi hosts
What I've done is that I created a separate networking for StarWind on my standard vSwitch on both hosts. A SAN network and also a SYNC network. Then in both VMs I associated the second and third NIC(s) with this network, which will basically be used for the iSCSI and synchronization channel traffic. Make sure that both ESXi hosts has this network label the same.
I created iscsi vmkernel network adapters on both of my ESXi hosts and the “trick” is to set the nic teaming to this vmkernel adapter as followes:
- Check the box override the switch failover order – No matter how many NICs you have there (you can obviously have more than 2) but, you must keep a single adapter as active! Keep one active and the other one as unused.

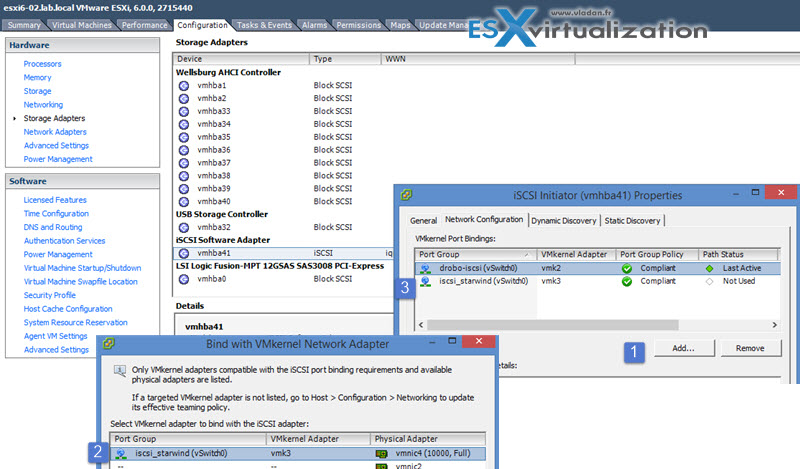
Then only when you start to configure an iSCSI initiator via Configuration > Storage adapters > Right click > Properties
Note: if you don't use iSCSI initiator on your ESXi host and this initiator is not showing up, you must first do a right click > new iSCSI software initiator. Then an empty iSCSI software initiator shall appear through the UI.
If you have 2 active adapters or you leave the default's of your virtual switch, then you have no vmkernel adapter to bind to….
Screenshot showing an iscsi_starwind vmkernel adapter bound to a software iSCSI initiator.
The networking view of ESXi.
In the lab I have two 10GbE uplinks connected to a single vSwitch so I separated the SAN traffic from the VM traffic (with active/standby) for each port group.

If I'd created separated vSwitch for the SAN traffic, then I'd loose a failover capacity as there would be only single uplink per vSwitch. That's why I chose single vSwitch scenario. For different scenarios where more NICs are connected to each host, you'd possibly create a separate vSwitch for the SAN traffic.
So the Network properties (with a look at the StarWind Virtual SAN ) looks like this:

Deployment of StarWind OVF.
Now we need to deploy the OVF – The steps:
Pick the OVF file by using vSphere client > File > Deploy OVF Template

I picked up Thin disk deployment option for my lab. Follow the assistant, and enter the required IP, netmask, DNS and gateway information….

Once done the VM starts. Make sure that you install the latest VMware Tools and reboot the VM.
Now let's get back to StarWind Configuration. Inside the VMs you'll find StarWind v8 pre-installed. What you should do first is to add both VMs to a Microsoft domain. I suppose that you know how to do that.
The Starwind VM after deployment has 3 vNICs installed – their settings are mentioned when running of OVF during the step Properties (StarWind Setup). So the Starwind VM's properties looked through vSphere client looks like this:
- 1st vNIC = VM traffic
- 2nd vNIC = SYNC traffic
- 3nd vNIC = SAN traffic

Once you start the StarWind Console inside of one of the VMs and click connect host, you're prompted for a license. You have the choice to apply a trial or you can request free version.

The next step you're asked to configure storage pool and by default it points to your C: drive as the other drive isn't online yet.

Make sure that you put the drive online first…

Then what you have to do is to add a device which will be exported as an iSCSI target. Choose Hard disk device > Virtual Disk
And I picked up the E: drive which we just brought online…

Next step would be to create the mirror. Right click the Imagefile2 > Replication manager, where we'll add a replication partner.

Replication partner is our second StarWind node, and we will remotely create another image file there which will be used for the mirror.
Click the Add Replication partner link and follow the assistant.

Continue with the assistant > add the IP address of the second StarWind VM > And select create new partner device option.

Again, go for the S drive and create new image file (in my case the name is starwind2.swdsk).

And on the next screen, click the Change network settings button to select which network is used for syncing and which for heartbeat.

The rest of the setup is quite standard and we have done it here on the blog already. What I'd like to point out with this review is the fact that the pre-packaged StarWind VSA where the Windows Server OS and StarWind Virtual SAN are both pre-installed and pre-configured with the right number of NICs (three) and other virtual hardware to get you started.
Your role is just to configure few things and activate both systems if you want to or just use a trials in case you are doing a POC (proof of concept) work.
StarWind is able to assure highly available clustered datastore where in case you chose synchronous replication you have 2 nodes HA cluster which has a two way replication enabled. Screenshot shows the Path selection policy is currently MRU (most recently used), but you can also choose RR (Round Robin) which is more appropriate. By selecting the drop-down menu and choosing Round Robin > Validate on the Change button.

Click rescan and you should see the StarWind iSCSI target appear through on the bottom panel.. Note that StarWind supports VAAI (vStorage API for Array Integration) for certain VAAI storage operations like VM cloning or creating VMs snapshots, transforming VMs to templates or deploying from templates. All those operations are offloaded from the hypervisor level and accelerated via the storage layer. You can check the different datastores in my lab and some of them, including Starwind are supporting VAAI.

StarWind Virtual SAN allows to scale out from 2 nodes only which is one of the few software solutions out there allowing this, (usually 3 nodes are necessary) but can scale to three or more nodes with either 2-way or 3-way replication between HA LUNs .
The performance can be enhanced by using local SSD device in each server as local L2 cache. This is possible to do through the setup wizard …

Wrap up:
I am excited to see StarWind Software coming up with new offerings, like StarWind HyperConverged Appliance. It’s a great step forward, when a company starts offering a turnkey pre-tested and pre-configured solution. In this case, a client can be relieved of the burdens connected with putting together the system from scratch. Instead – just purchase a ready to be used bundle with servers, spindle disks, flash, hypervisor and associated software as a single product. Moreover, the platform is shipped fully configured so as soon as you put it into the rack you can start spinning up virtual machines in a matter of minutes.
Way to go, StarWind Team!
Download and test StarWind Virtual SAN as an OVF here.
Note: Please note that this review was sponsored by Starwind.
Overall how was the actual performance?
Mark,
My homelab hardware, wasn’t really certified to be able to run any performance tests, you know. So if you want some performance graps and numbers you’ll have to look for an independent performance tests review (if any) or reach to Starwind to see their internal testing.
best,
Vladan